CNC G-Code variable programming
Like all programming languages, G-Code had the ability to use variables within our programs.
Variables give us the ability to store information that we can later recall.
There are many reasons we would need to use this, we can store information from probing cycles, write our own canned cycles and even do math equations to work out unknown dimensions.
In this article, we are going to look at a basic application as an introduction to programming G-Code with variables.
The above video lesson is part of a macro b course available here
Macro B Variables

As an introduction to programming with variables, we are going to look at one way we can machine a family of parts with just one program.
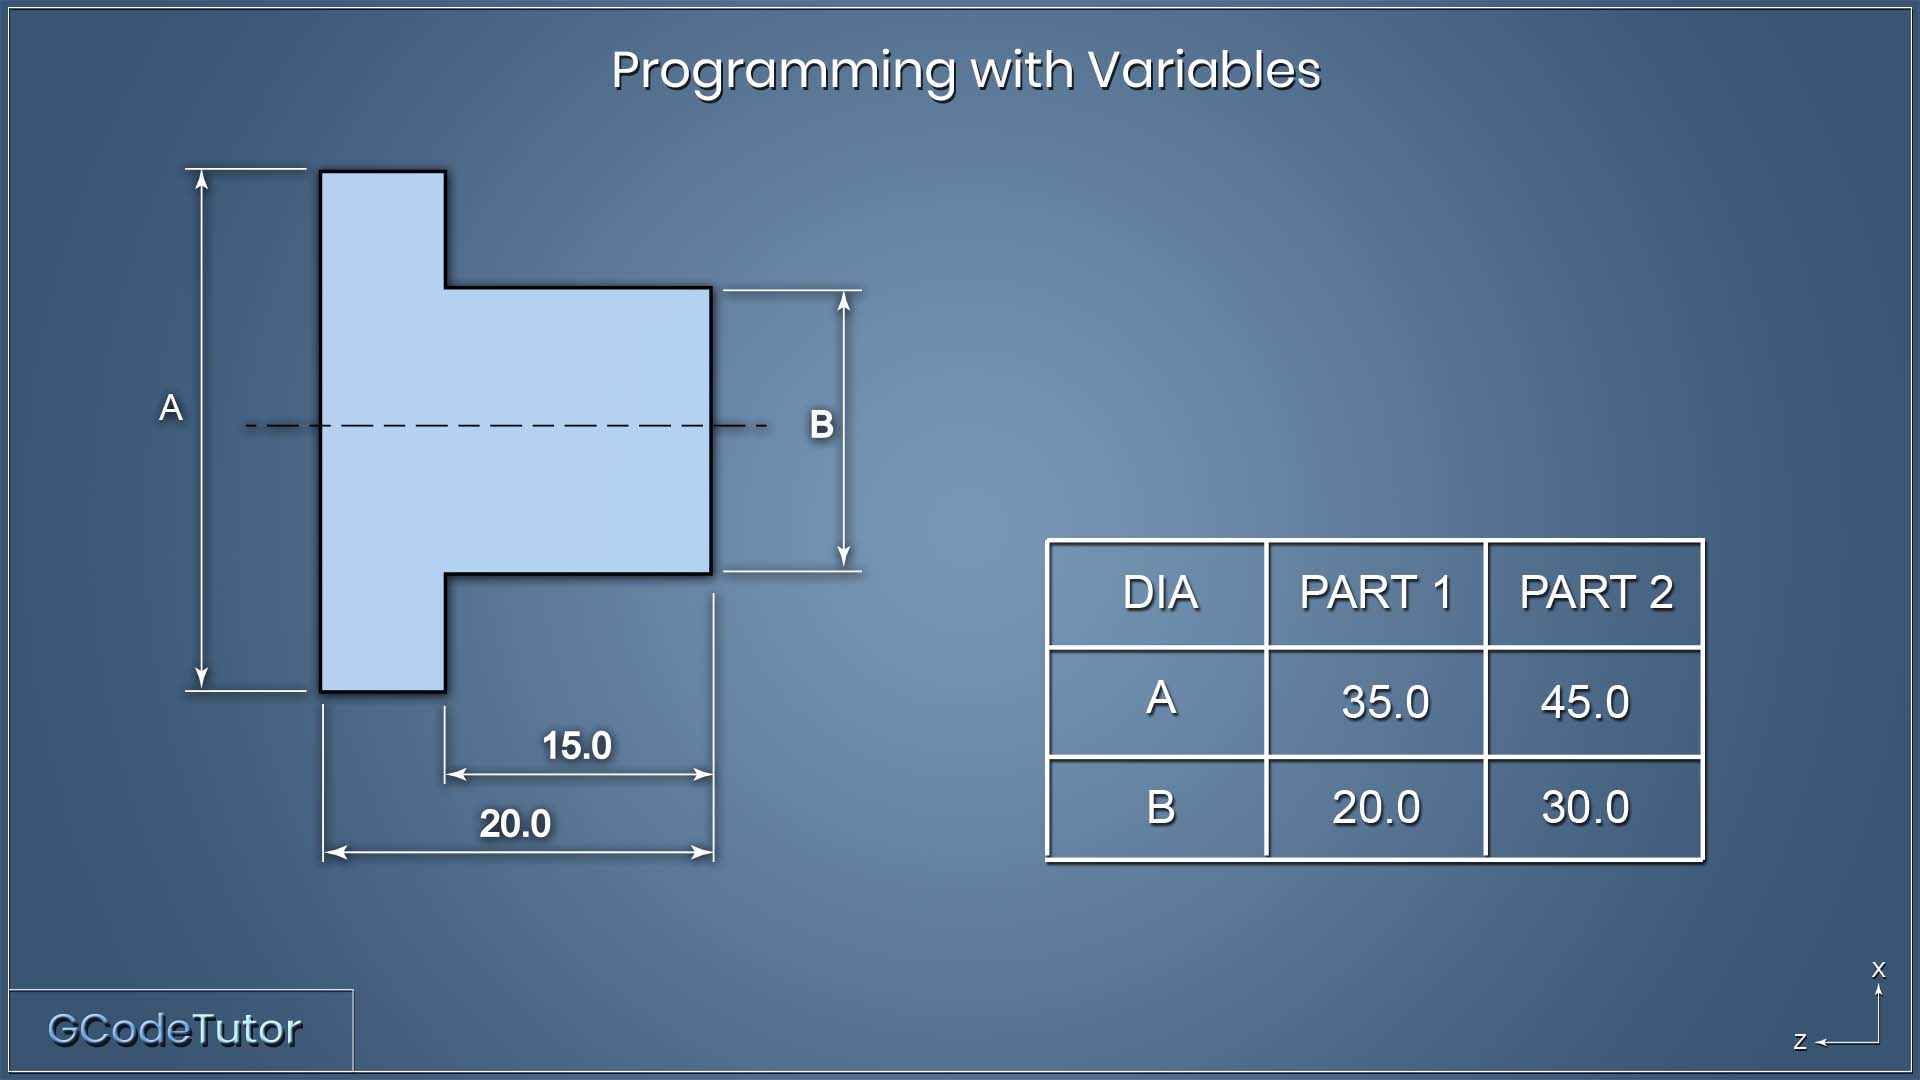
This diagram shows a simple pin with two sets of dimensions, the parts are known as part A and part B.
A batch of each has to be made.
Defining a variable
A variable in G-Code starts with a '#' symbol and they start with no value.
We can give a variable a value like this:
#101=35.0
Now that the variable has a value, every time we use #101 in our program the machine will read it as 35.0. for example, we could say 'X#101' instead of 'X35.0'
An Example Program
Here is what a roughing cycle may look like on a CNC Lathe that uses variables to control two diameters and a varying bar stock size
#101=35.0 (DIA A);
#102=20.0 (DIA B);
#103=50.0 (BAR STOCK DIA);
;
N1 (ROUGH TURN);
G54 G40;
T0101 M06;
G50 S2500;
G96 S280 M03;
G00 X[#103+3] Z5.0 M08;
G01 Z0.1 F0.1;
X-0.2 F0.05;
G00 X[#103+1] Z2.0;
G71 U1.0 R1.0;
G71 P100 Q200 U0.2 W.05 F0.2;
N100 G00 X[#102-1];
G01 G42 Z0.0 F0.2;
X#102 Z-0.5;
Z-15.0;
X#101;
Z-25.0;
N200 G40 X[#101+5] Z5.0 F200;
G53 X0.0 Z-210.0 M09;
M05;
M01;
At the start of the program is our variable list. We have defined the variables here and added an operators note explaining what feature each variable controls.
#101=35.0 (DIA A);
#102=20.0 (DIA B);
#103=50.0 (BAR STOCK DIA);
This would make 'part A'
By changing the variable #101 to 45.0 and #102 to 30.0 the program would make 'part B'
The diameter of the bar stock can be changed here also by using the variable #103.
Working with G-Code Variables
The first variable we meet as we read down our program is the #103 variable that we used to define our stock bar size.
G00 X[#103+3] Z5.0 M08;
This line is telling the machine to rapid travel (G00) to an X position of 50mm plus 3mm. We gave the variable #103 a value of 50.0 at the start of the program and we wish to add 3mm to this as a safe rapid distance from the stock bar. Brackets are used because we are doing maths within our program. If we were simply moving to X50.0 we would write it as X#103.
N100 G00 X[#102-1];
On the first line of our subroutine we reference our next variable, the #102 that controls diameter B.
Using brackets we minus 1mm from this position to bring our tool to the start of the 0.5mm chamfer at the front of the part. by using maths again we can change this variable and still cut the same size chamfer no matter the diameter of the pin.
X#102 Z-0.5;
Z-15.0;
X#101;
As we read further down the subroutine we arrive at our next variables, As no calculations need to be performed at this stage the brackets are not needed, we just state it after calling the X-axis.
Wrapping up
Using the techniques above, we can change the diameters of the pin just by changing the two variables at the start of the program
This is a basic look at variables, but they can be used for much, much more.
To learn the many ways this can be implemented in your programs, check out my course on Macro B programming where I teach maths with variables, Macro functions, Branches and loops, Logical expressions, Trigonometric functions and more advanced G-Code programming techniques.
Share this article
To learn advanced G Code programming, check out my Macro B course
The quickest way to learn CNC Programming


